Pressure decay testing is most commonly used in catheter leak testing. Of course, there are some test variations to accommodate different types of catheters, so you need to have the right pressure decay leak test system for the specific type of catheter. This blog post will review leak testing procedures for both non-compliant balloon catheters and multi-lumen catheters.
Catheters are used in various types of patient care—including administering intravenous medications and performing surgical procedures—so ensuring proper catheter performance is critical.
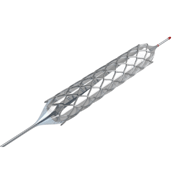
Non-compliant balloon catheters, for example, are used for vessel dilation and stent delivery. Balloon catheters are equipped with an inflatable balloon near the distal or outlet of the device. This balloon can be inflated to a specific diameter using relatively high-pressure injections of saline or a radiopaque solution. There are both stented and non-stented balloon catheters, but we will focus on non-stented catheters in this discussion.
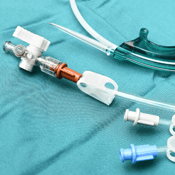 A multi-lumen catheter typically used for intravenous procedures, such as blood exchange or drug delivery.
The test criteria for multi-lumen catheters are different because you don’t want cross-contamination, so you need to test each path for leaks and blockages. The basic leak test requires sealing and pressurizing each test path.
Testing Catheters for Leaks
Pressure decay testing for catheters typically uses dry compressed air or nitrogen. The female luer is fitted to the test using either an ISO-80369 metal or CTS Connect luer fitting, which is specifically designed to create a seal on both male and female luer fittings. Once the luer is connected, you can start the test.
First, the catheter is pressurized to the desired test pressure. For non-compliant balloon catheters, the test pressure ranges from 150-450 psig. For multi-lumen catheters, the test pressure is usually from 5-200 psig. Leave sufficient time before measuring the decay to allow the pressure to stabilize. This time can also counteract factors that may affect test results, such as temperature, expansion, and absorption.
Run the pressure decay leak test and record the pressure drop, comparing it to a minimum and maximum loss limits to determine if there are leaks. Once the test time has elapsed, the pressure is vented using a defined exhaust time. Depending on the test results, the unit is either passed or failed.
Whereas pressure decay testing is useful for non-stented balloon catheters, stented balloon catheters are best tested using vacuum or low-positive pressure testing, typically between -12 and +10 psig to prevent deformation of the stent after it has been crimped over the balloon. The test is identical in function to a high-pressure decay test, but instead uses vacuum or very low positive pressure.
For a multi-lumen catheter, the distal end of the catheter must first be sealed either using a pinching mechanism or a CTS Connect depending upon whether the catheter is tipped and holes skived in the sidewalls of the lumens. Then each lumen can undergo the same leak test sequentially to ensure there are no leaks from lumen to exterior or from lumen to lumen.
Testing Multi-Lumen Catheters for Blockages
In addition to testing for leaks, you may need to test for possible blockages in multi-lumen catheters.
First, the distal seal must be released to allow each lumen’s outlet to flow to atmosphere. You can then use mass flow or minimum pressure decay testing to look for blockages in each lumen of multi-lumen catheters in a sequence by testing one lumen at a time.
Mass flow testing allows you to test the air flow rate through the lumen, measuring volume per unit of time which most often has the sensitivity needed to detect partial blockages. This is done by pressurizing the lumen until the pressure is stable, then introducing a transducer to measure flow through that lumen. You can compare minimum and maximum flow limits to identify partial blockages.
If testing for partial blockage conditions is not necessary, an easier way to test for complete blockages is by performing a rapid pressure decay test, then looking for a minimum loss of pressure in a specified time. To test for blockages using minimum pressure decay, you fill the catheter to a fixed pressure—just as you would for a leak test—and set the stabilization time to a minimum value (e.g., 0.05 seconds) to minimize pressure loss through unblocked parts. You then measure the pressure loss (decay) over a fixed time to see if there is a blockage. The test time is short, usually between 0.1 and 1.0 seconds, to permit an intentional pressure loss of 50-80 percent of the original test pressure.
The Sentinel Blackbelt and Sentinel Blackbelt Pro Can Test It All
Even though there are different types of tests for different types of catheters, you only need either a CTS Sentinel Blackbelt or a Sentinel Blackbelt Pro to perform testing, even for multi-stage tests such as leak and blockage testing on the same part.
The Sentinel Blackbelt is a single-channel, benchtop instrument that can be configured for pressure decay, vacuum decay, and mass flow testing. The Blackbelt provides the most functionality of any benchtop leak test in the industry and is used for most lower production rate non-compliant balloon catheters. It can also be equipped with up to 4 sequential test ports, making it ideal for testing multi-lumen catheters.
The Sentinel Blackbelt Pro is a multi-channel benchtop or wall-mount instrument with features that support 21 CFR Part 11 and EU Annex 11 requirements. It has up to four independent concurrent test channels, synchronous and asynchronous test capabilities, making it ideal for testing multiple part non-compliant balloon catheter testing using pressure decay, vacuum decay and mass flow testing.
Any medical device manufacturer making catheters can test 100 percent of parts in production using CTS instruments. Contact us to learn more about the right setup for your application.
Learn more at the below links:
