The simplest and least expensive type of leak rate test is dunk testing for bubbles. Even if you know nothing about leak testing, you have probably used a bucket of water to find a leak in an inner tube by looking for bubbles. The principle is always the same—immerse the part and look for bubbles to identify the leak.
However, it’s one thing to find a leak, but a leak rate test will also determine the amount of gas that is leaking within a specified period. As with any type of leak testing, you need an accurate means of measuring the leak rate using a reliable and repeatable test. It’s a given that everything leaks, so the only way to know if a part’s leak rate is acceptable is to define the maximum allowable leak range and test to ensure the leak rate doesn’t exceed the maximum.
Let’s look at a couple of scenarios using dunk testing.
Calculating Leak Rate for Dunk Testing Pressurized Parts
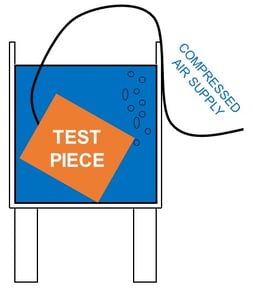
For this example, we will use a water depth of one meter as the baseline for our test. We pressurize the part, dunk in a water tank to that depth, and then watch for bubbles. At that depth, any bubbles that appear will form to a consistent size of 3 mm each. We can convert how long it takes for a bubble to fully form into an actual repeatable leak rate.
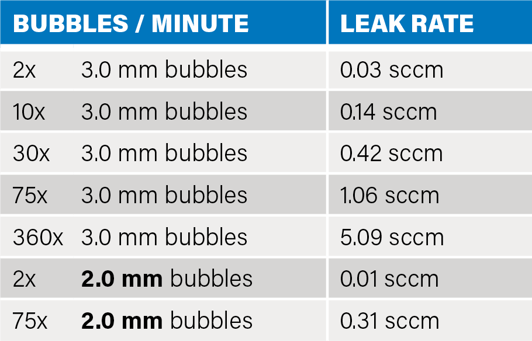
If you have two bubbles per minute that equals a leak (flow) rate of .03 cc per minute. If you have 10 bubbles in a minute, that’s a flow rate of 0.14 cc per minute. Thirty bubbles per minute is in the 0.5 cc range. Once we are at a flow rate of 1 cc per minute, that’s 70-75 bubbles per minute. With a rate this high, it’s difficult to achieve repeatability with dunk testing for most applications.
It’s important to note that the flow of bubbles from a part that has been pressurized does not 100 percent equate to the ability of water to leak into that part. It depends on your leak path length, shape, and hole size.
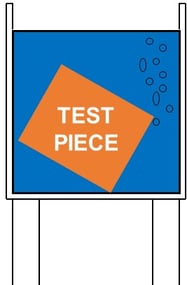
Dunk Testing Sealed Parts
Now, let's talk about dunk testing sealed parts.
 In this scenario, we are not pressurizing the part as the first step in the test. We don’t have to—the part has been assembled with atmospheric pressure encapsulated within it. The question then becomes whether the part assembly occurred correctly to prevent the part from losing this internal state of equilibrium. In other words: Does the part have a leak path through which this internal pressure can be lost?
When a sealed part is submerged to our 1 m test depth and there is a detectable leak, bubbles can only form in one of two ways.
First: There must be a differential between the part’s internal pressure and the pressure of 1 m of water. A part placed under water has a negative pressure associated with it. This means that the air trapped within will not flow out. To create a pressure differential that will reveal an undesired leak in the form of bubbles, a temperature variation between the part and the water must be introduced.
Second: There is a direct volumetric relationship between water forcing its way in and air being forced out of a sealed part. Whatever the volume of a visible bubble, that amount of air has been displaced by an equal volume of water.
This means that if the leak path is too small or torturous for water to penetrate, but can still allow that internal atmospheric pressure to escape in the form of air, an undesired leak can still be present without forming a visible bubble during a leak test. To catch leak rates that small, we have to move from dunk testing to pressure decay or vacuum decay leak test methods.
Bubble Testing vs. Automated Leak Testing
Bubble testing is the most basic form of leak detection and it has its limitations, such as being difficult to scale and relying on operator subjectivity. For more precise leak detection, consider using automated leak testing.
Automated leak testing is a dry, non-destructive test process with a smaller test footprint (i.e., no dunk tank required). It also provides an objective, repeatable test environment that delivers greater accuracy for pass/fail testing and provides test data to use for both metrics and traceability.
Adopting automated leak testing also lowers the cost of testing. In the long run, you realize savings with fewer personnel required to conduct tests, higher test throughput rates, reduced scrap from test units, and other benefits.
Leak Test Technologies: Pressure Testing Example
To automate a test, a manufacturer can choose between pressure decay, vacuum decay, mass flow, or trace gas leak testing. There are many factors that affect the selection of a leak testing methodology, such as specific features of the part (e.g., design, materials, size), the desired leak rate, target cycle time, and so on.
Let’s review an example of using pressure testing on a sealed device.
When bubble testing sealed parts, the pressure differential between the water and the air inside the part may not be sufficient to show bubbles, especially if the leak path is small enough that it can be clogged by water. If the leak is in the non-water leak rate range, then you will need to use pressurized tests to test leak rates.
To conduct this type of test, you pressurize the part through an open port or put a sealed part in a test chamber to perform either a pressure decay test or a vacuum decay test. When testing to IP67 specifications, using a pressure differential of 1.5 pounds per square inch will meet the specifications. Sensitivity for pressure leak testing is much greater than a simple bubble test, providing repeatable, accurate results to 0.001 scc/s.
With pressure testing, you are measuring the change in pressure over time, so several factors may affect the total test time:
- If you have a larger part, you will need more time to test because of the larger volume.
- If you decrease the leak rate, then you will need more test time for an accurate measurement.
- If you must measure a larger pressure loss, then your test time will be greater because of the low signal-to-noise ratio.
- If you have flexible parts, then you will need more time to stabilize the part to get an accurate measure of pressure change.
For the most accurate pressure decay and vacuum decay testing, you are looking for an optimal test cycle time, including:
- The smallest possible decay volume over time.
- A very stable, repeatable pressure measurement.
- The greatest possible resolution to measure the highest possible signal-to-noise ratio.
For differential pressure decay testing, you are pressurizing both a part and a reference volume, and then isolating the pressure in those two elements. From there, you can measure the pressure change in your part over time and reject measurements that may be related to the pressure loss or a volumetric flow, calibrated to an actual leak rate. You get better correlated data and accuracy with this type of leak test.
Find the Right Alternative to Bubble Testing
Bubble testing is a good starting place for leak detection. However, depending on the part, advancing from bubble testing to more sophisticated leak testing offers a number of advantages. The professionals at CTS are always available to advise you on the best possible testing approach and help you find the right hardware for your testing needs. Contact us to discuss your application. We are always happy to help.
Access the on-demand webinar, "An Overview of Pressure Decay, Differential Pressure Decay, and Mass Flow Technologies," and get the differences between pressure leak test technologies and how best to use them for accurate leak testing.

